We’ve built on the last tutorials to have a full linux system running on our Zybo board (although all this will work with the Zedboard or MicroZed with small modifications). We now are going look at using Xenomai to give our system realtime capabilities. Most people associate realtime with speed, but that’s not necessarily true. Although most realtime system are very fast the most important aspect of a realtime system is the deterministic behaviour that it provides. It can guarantee that an event will happen at a certain time all the time, if it doesn’t then the system can fail. A realtime system can be hard or soft. Hard realtime systems are usually found in safety critical systems and can not fail, if it does there could be deadly results. Soft realtime systems are more common, live streaming video is a great example of a soft realtime system. If the system misses an deadline then the worst that can happen is the user sees a blip in the video or a couple of dropped frames.
Xenomai (cobalt core) is a dual kernel system that give Linux realtime capabilities. It splits the system into two domains primary and secondary. The primary domain is the realtime domain and this is where all of our realtime code should reside. The secondary domain is the non realtime domain, it is usually is comprises of the Linux domain and it can use any of the Linux functionality. The primary domain on the other hand can use a subset of Linux resources or else it may cause a domain switch to the non realtime domain. We’ll go over more how Xenomai works in future tutorials as we go over userspace and kernel space code that interfaces with Xenomai.
Before we start building our Xenomai patched kernel let go over the things we should have completed by now:
- FSBL or U-BOOT spl bootloader
- U-BOOT bootleader
- A root filesystem
For our Xenomai system I would recommend using the Ubuntu 16.04 root filesystem that we built. Because we will be adding extra libraries I find it’s easier to go with something that is persistent. I’ll go over how we would use Xenomai with a minimal root filesystem but because there are a fair amount of Xenomai libraries and utilities the RAM disk may be too large to manage in RAM. If you’d like to use the Xilinx FSBL instead of u-boot spl that’s find remember that you’ll have to make a BOOT.bin image using the Xilinx SDK.
Now let’s get going on creating our Xenomai patched kernel. I worked from the Xenomai git repos, you can also download the latest stable release. Let’s go grab the Xenomai source code:
git clone git://git.xenomai.org/xenomai-3.git
Once we have that we need to go get our ipipe patch. What is the ipipe you ask? The ipipe project is a open source project and is a patch onto the Linux kernel that gives Linux the ability to implement an executive running side-by-side. This is what gives Xenomai the ability to run in the dual kernel mode. It also makes it possible for the Linux kernel to have deterministic interrupt response times. Most importantly this is the foundation that Xenomai is built on. If you’d like to read more about the ipipe check out this link.
We don’t need to download the ipipe project just the patch for the Linux kernel. In the past this patch was included in the Xenomai source tree but if the newer versions of Xenomai they’ve removed the patch from the source tree. We now must go fetch the patch from this link. Before we grab the patch we will need to figure out what kernel version we are going to compile. In our previous tutorial we used 4.1.18 kernel, but this we’ve done that tutorial a new patch set has been released. Therefore we will try to do our work using the 4.9.24 kernel which we have a ipipe patch for. Let’s go ahead and download the ipipe patch. I usually download it into the xenomai directory. I’ve included a direct link here if anyone is having troubles downloading it.
So now we have the Xenomai source code, the ipipe patch that we need and we should have the Linux kernel source as well. If you don’t we need to clone the stable tree like so:
git clone git://git.kernel.org/pub/scm/linux/kernel/git/stable/linux-stable.git
Now we need to make sure we have the correct branches checked out before we start trying to patch and build our Xenomai based kernel. We will start with the linux stable tree, let’s checkout the 4.9.24 tag and make a branch for it.
git checkout tags/v4.9.24 -b zynq_xeno_4.9.24
So this should create a new branch for use that is based on the 4.9.24 kernel. Next we need to make sure we are on the correct version of Xenomai. Change directory into our xenomai source directory.
git checkout tags/v3.0.5 -b xeno_3.0.5
This will create a local branch for us on the 3.0.5 tag which is the latest stable release of Xenomai.
Since we will be jumping around from directory to directory you may find it easier to create environment variables for the path to each directory that we need. For me I used the following:
export XENO_HOME=/home/ggallagher/devel/xenomai-3
export LINUX_HOME=/home/ggallagher/devel/linux-stable
export LINUX_XENO_BUILD=/home/ggallagher/devel/linux-xeno-build
These are straight forward and you obviously should change them to point to the source on your own system.
We have our branches set up, we should make sure we have our build output directory created and we can start patching our kernel. When we apply the ipipe patch if for some reason it fails or you forgot a build option then remember to clean the branch using the git clean commands or else we will have half patched files sitting there. There doesn’t seem to be an option to do a dry run in the scripts help options so it’s basically all or nothing.
Change into your XENO_HOME directory and we’ll run the prepare kernel script to get our ipipe patch applied. Make sure you remember where you downloaded your ipipe patch to, since we will need it in this step.
./scripts/prepare-kernel.sh --arch=arm –ipipe=../ipipe_patches/ipipe-core-4.9.24-arm-2.patch --linux=$LINUX_HOME
I saved my ipipe patch in a directory called ipipe_patched at the same level as my Linux and Xenomai directories. This will succeed if we see no errors stating a chunk couldn’t be applied. If you do see that check to make sure you’ve checkout the correct branch and are applying the correct patch. If you found our mistake then make sure to use the git clean commands to clean out the linux source directory. Worst case post your results in the comments and I can see if I can help.
Next we need to do our kernel configuration step. Same as the tutorial before, let’s cd into our Linux directory and execute the following command. Again remember to copy the zynq defconfig back into our Linux tree since it doesn’t exist in mainline.
make ARCH=arm CROSS_COMPILE=arm-linux-gnueabihf- O=$LINUX_XENO_BUILD xilinx_zynq_defconfig
Here we see exactly why we learned to build the mainline kernel. We did so because we want to work with a kernel tree version that can easily have the ipipe patch applied on top of it. We are going to have to make some custom configurations in our menuconfig step. When we execute this command:
make ARCH=arm CROSS_COMPILE=arm-linux-gnueabihf- O=$LINUX_XENO_BUILD menuconfig
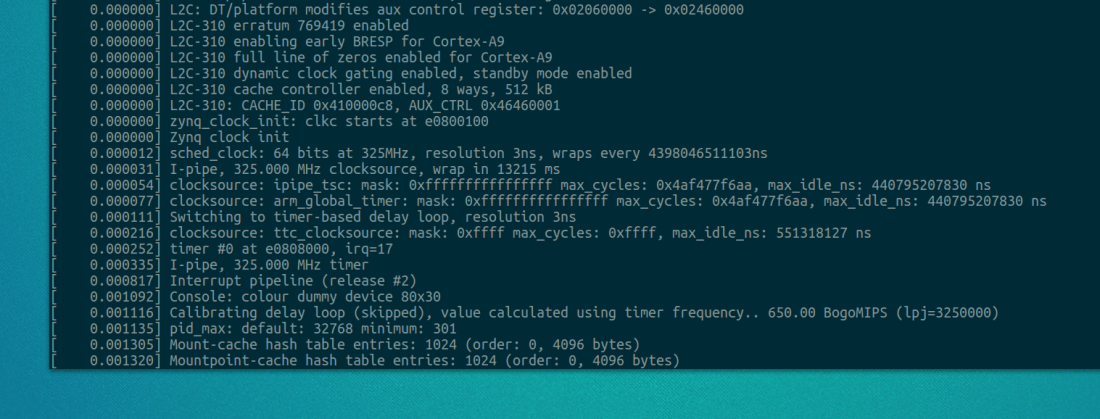
We are going to see some extra configuration options for Xenomai. We will also see some warnings advising us to turn off frequency scaling and another warning that I believe is about page faults. To turn those off we need to turn CPU frequency scaling off and turn off the CMA allocator. Frequency scaling can be found under CPU Power Management -> CPU Frequency Scaling -> then type N to exclude this option. To turn off the CMA allocator go to Kernel Features -> hit N over the contiguous memory allocator. The next option we have to disable most of the irq tracing. If we leave this enabled we get a error on boot saying that it has detected a deadlock. The output should look something like this.
[    0.579081]
[    0.585100]        CPU0
[    0.587595]        ----
[    0.590088]   lock(timekeeper_seq);
[    0.593615]   <Interrupt>
[    0.596280]     lock(timekeeper_seq);
[    0.599979]
[    0.599979]  *** DEADLOCK ***
[    0.599979]
[    0.606087] 1 lock held by swapper/0/0:
[    0.609955]  #0:  (timekeeper_seq){-?.-..}, at: [<c0080048>] __tick_nohz_idle_enter+0x28/0x42c
[    0.618555]
The system will still boot and work but I’m pretty sure this error message will come back to haunt us in the future. So let’s take care of it now. In menuconfig we need to turn off some of the kernel hacking features. In the kernel hacking section I turned everything off except for kgdb, which I figured it is a good option to keep if we can. Searching through the Xenomai mailing list is a great way to get some information about this issue and what features need to be turned off.
We are now ready to build out Xenomai patched kernel. Make sure we’ve switched into our linux source directory.
make ARCH=arm CROSS_COMPILE=arm-linux-gnueabihf- O=$LINUX_XENO_BUILD UIMAGE_LOADADDR=0x8000 uImage modules dtbs
So we should have no problems building the kernel and after that’s complete will install the modules into our root filesystem. Once we see our kernel has compiled successfully, we can do the following:
make ARCH=arm CROSS_COMPILE=arm-linux-gnueabihf- O=$LINUX_XENO_BUILD modules_install INSTALL_MOD_PATH=../zynq_modules/
Your module install path should be a directory where we can temporarily store the modules until we can add them to our root filesystem. We could do it all in one step but it’s sometimes easier to explain the process this way. Once you’ve executed that command you should see something that looks sort of like this:
INSTALL crypto/drbg.ko
INSTALL crypto/echainiv.ko
There will be some others, but it’s listing these modules as ones that the kernel can load dynamically on the fly. We can either load them manually as we need them out add them to the module list for the kernel and have them loaded at boot. We’ll leave this subject for now and come back to it once we’ve finished building Xenomai. We need to install these modules into our root filesystem so the kernel can find them on boot. We don’t need to do this right now to get our Xenomai install going but we will revisit this later when we add a wifi dongle to our system.
We now need to create the Xenomai libraries and tools that our system will need to run. Since we built this from git we need to do this step. If you ended up using a zip file you can skip ahead to where we build the arm libraries. Let’s go back to our Xenomai source tree and we need to execute the following command.
./scripts/bootstrap
This will get the Xenomai source ready to build our tools and libraries. Make sure you have autotools and autoconf installed or else this next step will error out. I haven’t really listed all the tools we need on our host system, I’ll leave that to the user as you get errors make sure you google them and see if you are missing any host side tools. We want to build our libraries and tools to match our target system. We have to make a directory to store the generated make files.
mkdir -p xeno3_build
Now let’s switch into that directory and we will generate the configuration and makefiles that we need to build the xenomai libraries and tools.
../xenomai-3/configure CFLAGS="-march=armv7-a -mfpu=vfp3 -mfloat-abi=hard" LDFLAGS="-march=armv7-a" --build=i686-pc-linux-gnu --host=arm-none-linux-gnueabi --with-core=cobalt --enable-smp --enable-tls CC=arm-linux-gnueabihf-gcc LD=arm-linux-gnueabihf-ld
If we look at this link here we can see all the options that we can include when configuring the tools to build. Since the Zynq platform is compiled with the hard floating point toolchain and this isn’t an option for the –host option we will have to supply the CC and LD options to tell the tools what the toolchain prefix is. The –host flag may be slightly misleading but that’s okay, just remember the –host flag refers to the target you are building for not the host environment you are building on.
We now should have a directory that is full of our configuration and makefile that we need to build our libraries and tools. We will need to build them into a stage directory and then install them into our root filesystem. I usually keep these outside of the root filesystem just so I can keep it clean but it’s not necessary.
make DESTDIR=/home/ggallagher/devel/emb_linux/xeno3_zynq_stage/ install
You could do this as two steps and do the install step as root and then install it into your root filesystem but because I’m keeping my Xenomai tools and libraries separate I don’t do that step as root.
If everything has gone well we should have a Xenomai patched kernel and Xenomai libraries and tools that will be needed for our target. We are now ready to install these onto our sdcard and get the system ready to boot.
First let’s get our uImage from the Linux build directory and copy that over to the BOOT partition of our sdcard. Next we can reuse our rsync command and copy over the Xeomai libraries and tools to our target root filesystem.
sudo rsync -aAXv <path_to_your_xeno_lib>/* /path/to/mount/point/
Once we have our patched kernel and libraries on our sdcard we can go ahead and see how we did. Hopefully everything should boot fine and we can move on to calibrating our system and running the latency tests.
Let’s boot our board. You should have it connected to a terminal program such as minicom so we can use the shell we are going to spawn over the uart. Once the board boots we can log in and examine the dmesg logs. We could look at the early printk as well and we should see some of the Xenomai initialization.
Let’s login as root since we will be executing some programs that need root privileges to run. The first thing we are going to do is run the latency tests and see what results we get with all the default parameters.
/usr/xenomai/bin/latency
Once we run this command the latency test will start to run and print out some statistics about the latency on the system. Below is what you may see on a non-calibrated system:
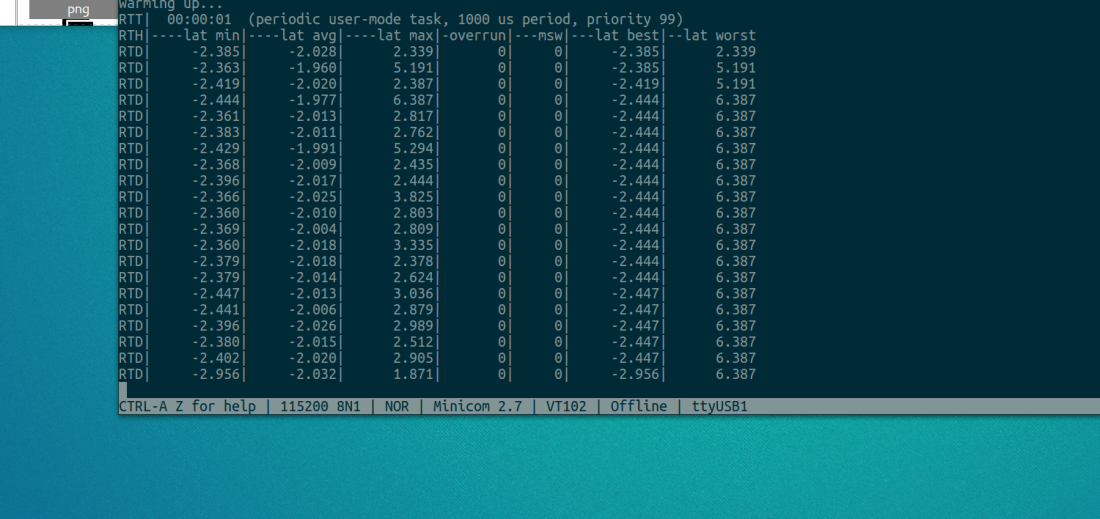
Our latencies are negative for some reason, which is confusing because that can’t be correct. After a little bit of digging on the Xenomai mailing list we find this is normal. From what I found searching online and the Xenomai mailing list in Xenomai 2 we need to decrease the /proc/xenomai/latency value until the minimum latency never drops below zero and at the same time we need to keep the worst-case as close to zero as possible. We can change this value by echoing a value into
/proc/xenomai/latency
This will also work for Xenomai 3, after playing with this value we see the latencies on the system start to look more sane. This however isn’t the best way of calibrating the system.
In Xenomai 3 we can use the autotune utility to calibrate our system. This was not previously available in Xenomai 2. What the autotune utility does is determines the correct gravity values. A gravity values is the shortest time our platform (Zynq in our case) needs to deliver an interrupt to a Xenomai interrupt handler, a RTDM (kernel space) task or a Xenomai user-space task. It will differentiate timers by the context they activate, this ensures the context will be activated as close as possible to the ideal time. There are three contexts, IRQ which is the Xenomai subsystem before the kernel, the kernel space and then user space. These values can be set in the file /proc/xenomai/clock/coreclk on Xenomai 3. After this utility is run the system will retain the final values until the next reboot. The autotune documentation can be found here. These value can be specified in the config variables specified in the documentation or the autotune utility should be run when the system starts.
To run this utility we can specify a couple different options that will let us calculate either each of the gravity values or all of them. We need to also give sampling period. We can specify other flags as well which I won’t go over now, but you can specify the –help flag to see what are valid arguments to the utility. For my system I wanted to get all three values so I didn’t pass any arguments about what gravity I wanted. If you don’t specify any it will do all three. I also gave the smallest sampling period I could. Too small of a sample period will cause the system to lock up. The default value for the sampling period is 1000000, so I ran the test numerous time reducing the number as I went. I finally finished on 10000 as my sampling period and I was able to complete the tests in about 17 seconds.

We now have our gravity values and we can go ahead and run our latency tests again.

We can now go ahead and run the xeno-test utility. This test will run our latency tests with load on the system. We can get a good idea of what type of latency our system will have at the best and worst case. This should give us a good idea of how our system will perform under load. If you see hight latencies then you should checkout the trouble shooting guide here.
Our base Xenomai system is now ready to start creating some realtime applications on. I’ll go over creating RTDM drivers and application level RT code in the next few tutorials. In the next few posts we will be looking at creating a design for the PL, the RTDM driver to control our hardware and then creating some user space code to interact with it.

Thank you for the continuous updates on these invaluable tutorials. Finally I’ve managed to catch up with everything, and now the system works as intended. I only need to configure some networking parameters, because no Internet connection is available at the moment (not even ifconfig), and I need an ssh. I’m really looking forward for the drivers.
Glad it’s working for you, I should have some drivers tutorials up very soon. Are you looking for regular kernel modules or RTDM drivers? I’m planing on doing both.
My module is a discrete wavelet transform based filter in HLS with AXI Slave bus, I don’t know which driver I want to use (I guess I will try both).
Btw, I don’t know if you noticed, but the mainline Linux with the new device tree has a serious bug – the USB port can’t be used. The kernel is loaded, the messages are posted in dmesg, and the module is shut down, no bus voltage, no devices shown with lsusb. There is a patch for Zedboard, and I tried to follow it for Zybo, but no luck. I’m just posting this in case someone finds it strange that a USB WiFi module or flash drive won’t work no mater what.
I’ll try adding a wifi usb stick to my zybo and see what I can do
Thanks for posting this! I’m trying to build a Xenomai system for a ZC702 system. I’m used to using the Petalinux tools, which makes generation of the package easier, but obscures how all of it fits together. Normally I place a boot.bin and image.ub on the SD card and boot that. But I don’t know how the image.ub file is generated. Petalinux somehow creates it along with the zImage file.
I managed to follow your building of the kernel, resulting in a zImage file. Any idea of how to bundle that into the final image.ub?
Do you know if I can point the kernel sources to your Xenomai sources and have it work? I may give it a try and see what happens.
Many thanks!
Robert
Hi,
I think I may have access to a ZC702 board, I can see if my method works on it. You shouldn’t need the image.ub, If you include boot.bin, the uImage and the correct device tree file you should be able to boot with no issues. The correct device tree for the 702 board is zynq-zc702.dts, so anywhere I use zybo-dts.dts or .dtb use zynq-zc702.dts or .dtb. I’ve confirmed all this works on the microzed, so I’ll do the same with the zc702. I’m not sure about the uart port that the shell would be spawned over, you may have to change that if you are using my Xenial rootfs. I’ll have a post for you on the weekend 🙂
Did you have a chance to check this out? I’m just getting back to it, and after building boot.bin, I now get garbage on my console when I try to boot (it doesn’t appear to match any known baud rate, so obviously I did something wrong here ;-). I’ll be experimenting more this week).
Many thanks,
Robert
What device tree are you using? I’ve got a 706 board here that I’m going to try out tonight and see how that goes
I was able to get it to boot, Did you use the 702 config for building u-boot? The 702 and Zybo have different clocks for the UART. I’ll post my steps this weekend.
I followed your U-Boot Secondary Program Loader On Zybo post, copying my ps7_init.* into my zynq-zc702 directory as ps7_init_gpl.*, fixed the .c file and built as per your instructions. What I get when I build ends with:
LD u-boot
OBJCOPY u-boot.srec
OBJCOPY u-boot-nodtb.bin
COPY u-boot.bin
SYM u-boot.sym
CC spl/common/spl/spl.o
LD spl/common/spl/built-in.o
CC spl/lib/display_options.o
LD spl/lib/built-in.o
LD spl/u-boot-spl
OBJCOPY spl/u-boot-spl-nodtb.bin
COPY spl/u-boot-spl.bin
MKIMAGE spl/boot.bin
MKIMAGE u-boot.img
./scripts/check-config.sh u-boot.cfg \
./scripts/config_whitelist.txt . 1>&2
This looks quite different from what your post mentions (e.g. I see no python script mentioned, and there is none in the tools directory). Maybe I’m pointing to the wrong version of the repository?
Also, I’m confused, as I don’t see where the FSBL or bitstream come into it. I’m used to using bootgen to do my work, but it expects a u-boot.elf file. And the Petalinux u-boot looks for a uimage.ub file rather than the device tree, uImage and system.dtb files.
Any pointers to where I’m going wrong would be appreciated!
What version of u-boot are you using? Are you using the FSBL or the SPL provided from u-boot? I have a post coming up that explains how to use the FSBL, bi.tstream with u-boot and linux. I’ll hopefully have time to post that this weekend
As I mentioned, I followed your U-Boot Secondary Program Loader On Zybo post, which clones https://github.com/Xilinx/u-boot-xlnx.git and generates spl/boot.bin. So I’m really looking forward to your upcoming post. I tried using bootgen to package a u-boot.elf file, but I see the same problem with the console RS-232 generating garbage.
Thanks again!
Perfect tutorial. The CROSS_COMPILE options are not needed for menuconfig and defconfig, and xenomai scripts use a –ipipe option (somehow copy-pasting from the web page seems to introduce a character that is not correctly interpreted by the terminal and a single ‘-‘), but works like a charm in a buildroot environment otherwise. Thanks.
yep, I add the CROSS_COMPILE flag to menuconfig and defconfig out of habit.
Hi Greg,
Great article! I am stuck at the very last step which is moving our build to a SD-card. The target hw is ZC706.
I have the following after following your steps:
1. uImage (from linux-xeno-build > arch > arm > boot)
2. zynq-zc706.dtb (from linux-xeno-build > arch > arm > boot > dts)
3. Boot.bin (which should contain fsbl.elf, u-boot.elf) I downloaded from a Xilinx Wiki page.
4. zynq_modules folder with the linux kernel modules installed & xeno3_zynq_stage folder with the xenomai3 libraries and tools installed.
My question is how do I create a root-FS for this kernel image? and transfer the installed module files in the 2 folders to the root-FS?
Thanks,
Viren
Hi Greg,
Great article! I am stuck at the very last step which is moving our build to a SD-card. The traget hw is ZC706.
I have the following:
1. uImage (from linux-xeno-build > arch > arm > boot)
2. zynq-zc706.dtb (from linux-xeno-build > arch > arm > boot > dts)
3. Boot.bin (which should contain fsbl.elf, u-boot.elf) I downloaded from a Xilinx Wiki page.
4. A default arm_ramdisk.image.gz from http://www.wiki.xilinx.com/Build+and+Modify+a+Rootfs. I expand this ramdisk and copy the xenomai3 tools and libraries into the /usr directory. Then convert the ramdisk.image to uramdisk.image using the mkimage utility.
My SD card has 2 partitions: /Boot (fat) and /Data (ext4). I copy all the above files to the /boot partition.
After trying to boot from SD card it seems that uboot is ** Unable to read file image.ub **.
As a work around i try to follow steps mentioned in the “Bootm Command Details” section of this website: http://www.wiki.xilinx.com/U-boot.
Now I get the error: ” Wrong Image Format for bootm command, ERROR: can’t get kernel image! ”
Can you help me out with this ? Any specific go-to steps you follow to boot custom linux on the ZC706 via SD card?
Thanks,
Virendra
Nevermind. If anyone faces this issue here is what I did.
I was able to resolve the issue by downloading a 2016.4 version of the boot.bin instead of using the 2017.1 version. The root cause may have possibly been the version of u-boot present in the boot.bin.
Later I faced issues with updating my ramdisk with the xenomai tools and libs. Use the ramdisk provided in the 2016.4 version as well.
Just follow the solution mentioned in: https://forums.xilinx.com/t5/Zynq-All-Programmable-SoC/Modifying-ramdisk-image-last-release-2014-2-Error-in-login-can-t/td-p/517099
Good luck!
Thanks,
Virendra
You can also follow my post on using a ubuntu root file system if you don’t want to use a ram disk.
Hi Greg!
I’m checking back, to see if you managed to fix the USB Host problem in Linux. I read all the posts on the Digilent and Xilinx forums from 2015 to 2017. Tried all the suggested fixes in the device tree modification, in forcing the kernel to enable VBUS, but nothing helps.
Thanks,
Áron.